
Many blogs and publications today have a way to tell how how many minutes it may take to read a particular article, mostly by displaying the average reading time at the beginning of the post.
This information is pretty useful, it tells the reader how long it might take to read through the article and gives an idea of how rich the content of the article might be, depending on the title.
We'll be adding this feature to our Nuxt blog built with the nuxt/content module using the reading-time package.
Prerequisites
For this tutorial, I'll assume that you've already set up your Nuxt project aFnd already have the nuxt/content module installed and set up. If you don't, and want to follow along, you can check out this article on creating a blog with Nuxt and Nuxt Content.
Alright, let's dive right in.
Install reading-time
The reading-time package helps you generate an estimate of how long an article will take to read. We just need to pass it our text, HTML or markdown content.
Navigate to your project folder and run:
npm install reading-time
Create a hook to generate reading time for each article
Now that we've installed the reading-time package, we need a way to get out text content from our articles and pas the to reading-time to generate an estimate number in milliseconds of our article reading time.
We'll use a hook provided for us from nuxt/content, which is content:file:beforeParse which basically allows you to modify the contents of a file before it is handled by the parsers.
So, in our nuxt.config.js file we'll add the following lines of code:
...

  hooks: {
    'content:file:beforeInsert': (document) => {
      if (document.extension === ".md") {
        const stats = require('reading-time')(document.text)
        document.readingStats = stats
      }
    }
  },

...
Here, we checked to see if the extension of the file is .md so it only applies to our markdown files.
Then, we accessed the reading-time package using the const readingTime = require('reading-time') statement.
The readingTime function takes an argument, which is our article text that we want to generate the reading time from. Nuxt Content generates the document.text property for us which is the body content of a markdown file before it is transformed to JSON AST that we see in our Nuxt app that it uses to render the content.
So, we pass document.text to readingTime which returns an object of values that looks like this:
// ->
// stats: {
//   text: '1 min read',
//   minutes: 1,
//   time: 60000,
//   words: 200
// }
We assign this object to stats and then add it to our document using document.readingStats = stats.
Now, If we run:
npm run build
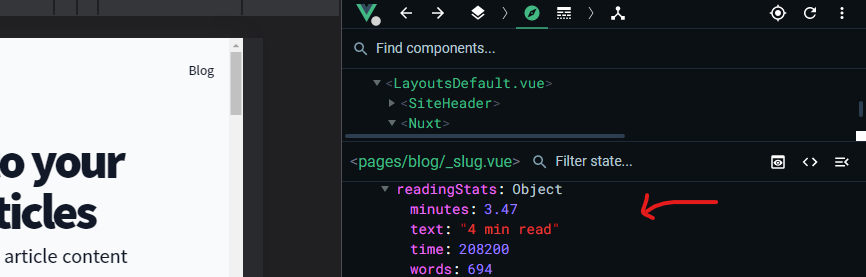
and if we check our devtools, we should see readingStats as part of our content object
Awesome!
Displaying reading time in the UI
If you've set up your blog, depending on how you fetch article data in your _slug.vue you probably already have access to the readingStats object.
For me, I have something like this in my <sript> in _slug.vue
...

export default {
  async asyncData({ $content, params }) {
    const article = await $content('articles', params.slug).fetch()
...
article is now available in my component and I can render my readingStats object in my template like so:
<span> {{article.readingStats.text}} </span>
and that should display the value on render.
Conclusion
Notice I used readingStats.text, it displays the reading time in text e.g. "4 min read"
There are other values you can use to achieve a higher level of customization.
You can learn more about them here
Useful links
- Creating a blog with Nuxt: https://content.nuxtjs.org/advanced/#hooks
- The Nuxt Content module: https://content.nuxtjs.org/
- Nuxt Content Hooks: https://content.nuxtjs.org/advanced/#hooks
Thanks for reading ❤